Swiftly Connect Intercom to Snowflake: 2 Efficient Methods
Learn easy ways to connect Intercom to Snowflake. The benefits include enhanced data analysis, reduced silos, and better storage efficiency.
Intercom is a powerful platform that enables your teams to connect and collaborate, enhancing customer experiences through email, chat, and social media. However, Intercom's native capabilities for data aggregation and analysis are somewhat limited, restricting your ability to perform in-depth customer behavior analysis.
To overcome this limitation, integrating Intercom with Snowflake is an ideal solution. By bringing your Intercom data into Snowflake, you can centralize all your customer interaction data, enabling advanced analytics and deeper insights.
This integration leverages Snowflake's scalability and powerful data processing features to provide a complete view of customer engagement. In this article, we’ll guide you through two efficient methods to load data from Intercom to Snowflake.
We’ll start with a brief overview of both platforms. However, if you’re already familiar with Intercom and Snowflake, feel free to skip ahead to the methods!
An Overview of Intercom
Intercom is an AI-first customer service platform designed to help organizations interact more effectively with their customers. Built on a unified AI system, Intercom enhances the customer experience through three key components:
- AI Agents: Intercom’s AI agents provide instant and accurate responses to customer inquiries around the clock. By ensuring that customer needs are promptly addressed, these AI agents significantly boost customer satisfaction and engagement.
- AI Copilot: The AI Copilot assists AI agents in real-time by suggesting responses and actions based on the ongoing conversation. This support accelerates the resolution process and ensures high-quality customer interactions.
- AI Analyst: The AI Analyst component empowers team leaders by delivering comprehensive insights and actionable recommendations. By analyzing data from every customer interaction, the AI Analyst identifies trends and patterns, enabling leaders to make informed decisions that enhance customer service strategies.
These components work in tandem to continuously collect and analyze interaction data. This ongoing process allows the AI system to refine its responses, improve support capabilities, and deliver increasingly accurate insights and recommendations over time.
An Overview of Snowflake
Snowflake is a fully managed Software-as-a-Service (SaaS) data warehousing platform designed to efficiently store and analyze large-scale data. Its architecture makes it an ideal solution for organizations seeking flexibility and scalability.
Snowflake’s architecture is built on the principle of separating compute and storage, allowing you to scale each component independently. This design enhances the scalability and efficiency of data processing, enabling you to allocate resources based on current demand without altering your data storage configuration.
Why Bring Intercom Data into Snowflake?
- Reduced Data Silos: Organizations often face the challenge of data silos when using multiple platforms, leading to inconsistencies and fragmented data. By integrating Intercom with Snowflake, you can consolidate all customer interaction data into Snowflake’s unified data platform. This centralization eliminates silos, simplifies analytics, and enhances decision-making by providing a comprehensive view of your customer data.
- Efficient Storage: Importing your Intercom data into Snowflake automatically optimizes it into compressed, columnar formats. This improves the efficiency of data storage and retrieval, reducing storage costs while also boosting query performance. Snowflake’s architecture ensures that your data is both well-organized and easily accessible for analysis.
- Advanced Analytical Capabilities: Snowflake’s powerful analytics and machine learning tools allow you to perform complex analyses on your Intercom data. By uncovering patterns and insights into customer behavior and preferences, you can develop personalized customer experiences and make informed decisions that lead to improved service outcomes. This advanced analytical capability is key to transforming raw customer interaction data into actionable intelligence.
Methods to Transfer Data from Intercom to Snowflake
Here are two efficient methods to connect Intercom to Snowflake for seamless data integration and advanced analytics.
- Method 1: Using Estuary Flow to Transfer Data from Intercom to Snowflake
- Method 2: Using CSV Export/Import to Load Data from Intercom to Snowflake
Method 1: Using Estuary Flow to Transfer Data from Intercom to Snowflake
Estuary Flow is a powerful CDC (Change Data Capture) and ETL (Extract, Transform, Load) solution that facilitates real-time data integration between a wide range of sources and destinations.
With Estuary Flow, you can build and manage real-time data pipelines to efficiently streamline data across various systems, including databases, data warehouses, APIs, cloud storage, and more.
Synchronizing data from Intercom to Snowflake is a straightforward process that requires only a few clicks with Estuary Flow. One of the key advantages of using Estuary Flow is that you can perform these integrations without writing a single line of code, making it accessible even to those without extensive technical expertise.
Here are some compelling reasons to choose Estuary Flow:
- Vast Library of Connectors: Estuary Flow provides over 200+ pre-built connectors to facilitate data movement between various sources and destinations. There are batch and streaming connectors that you can use to set up an automated data pipeline according to your needs.
- Change Data Capture (CDC): Estuary Flow supports Change Data Capture (CDC) to which automatically tracks and synchronizes changes, such as new inserts, updates, or deletions in your source database. With CDC, your Snowflake data warehouse stays up to date with the freshest Intercom data in real-time with sub-second latency.
- Efficient Transformations: Estuary Flow supports in-flight transformations called derivations. You can use SQLite or TypeScript transforms for your streaming and batch pipelines. This allows you to handle anything from simple remapping to complex transforms.
Now, let’s look into the easy steps involved in connecting Intercom and Snowflake with Estuary Flow:
Prerequisites
- An Intercom account.
- A Snowflake account with a target database, schema, virtual warehouse, and appropriate user roles.
- An Estuary Flow account.
Step 1: Configure Intercom as the Source
- Sign in to your Estuary Flow account.
- To begin configuring Intercom as the source, select Sources from the left navigation pane of the Estuary Flow dashboard.
- On the Sources page, click the + NEW CAPTURE button.
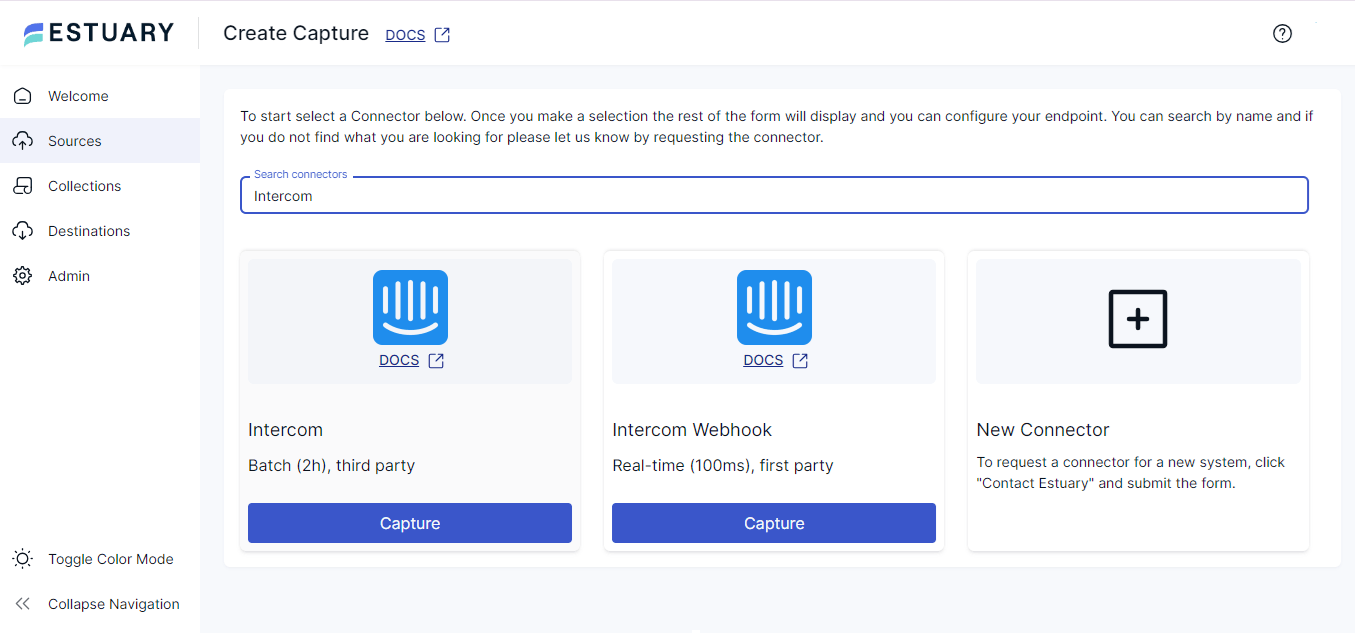
- In the Create Capture page, search for the Intercom connector using the Search connectors field.
- You will see two connectors: Intercom (for batch processing) and Intercom Webhook (for real-time data transfers).
For this tutorial, let’s select the Intercom connector. Click its Capture button to proceed with the setup process.
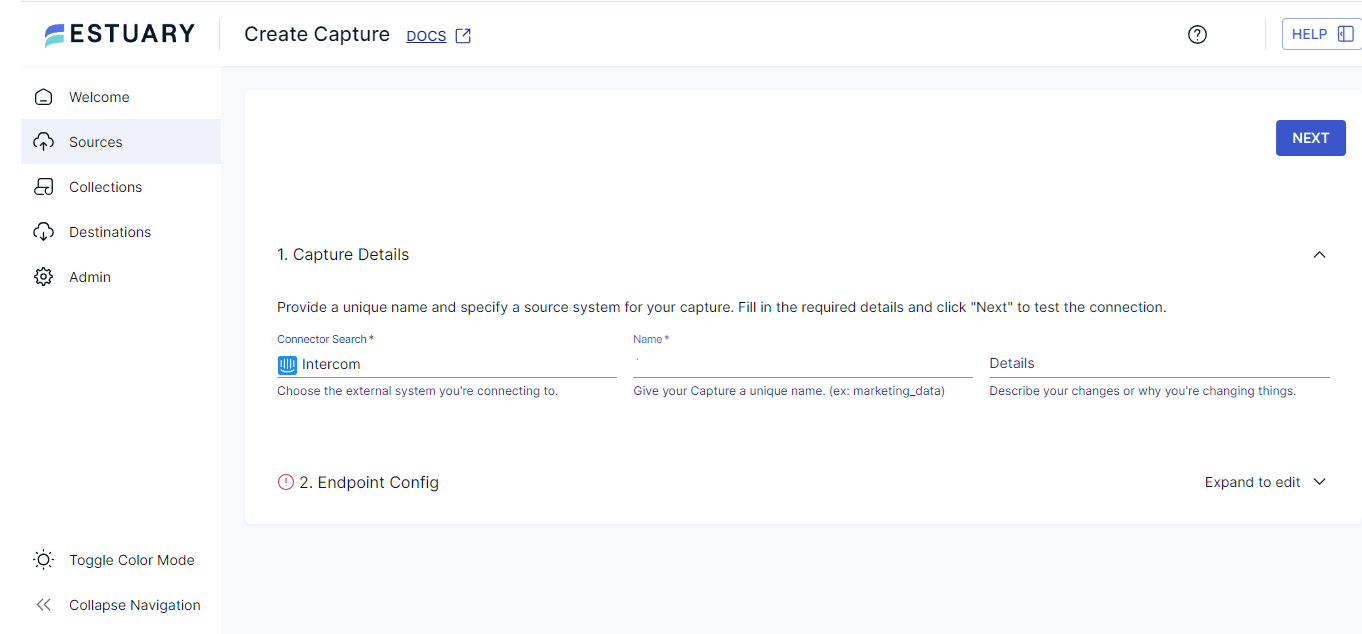
- On the Create Capture page, provide a unique Name for your capture in the Capture Details section.
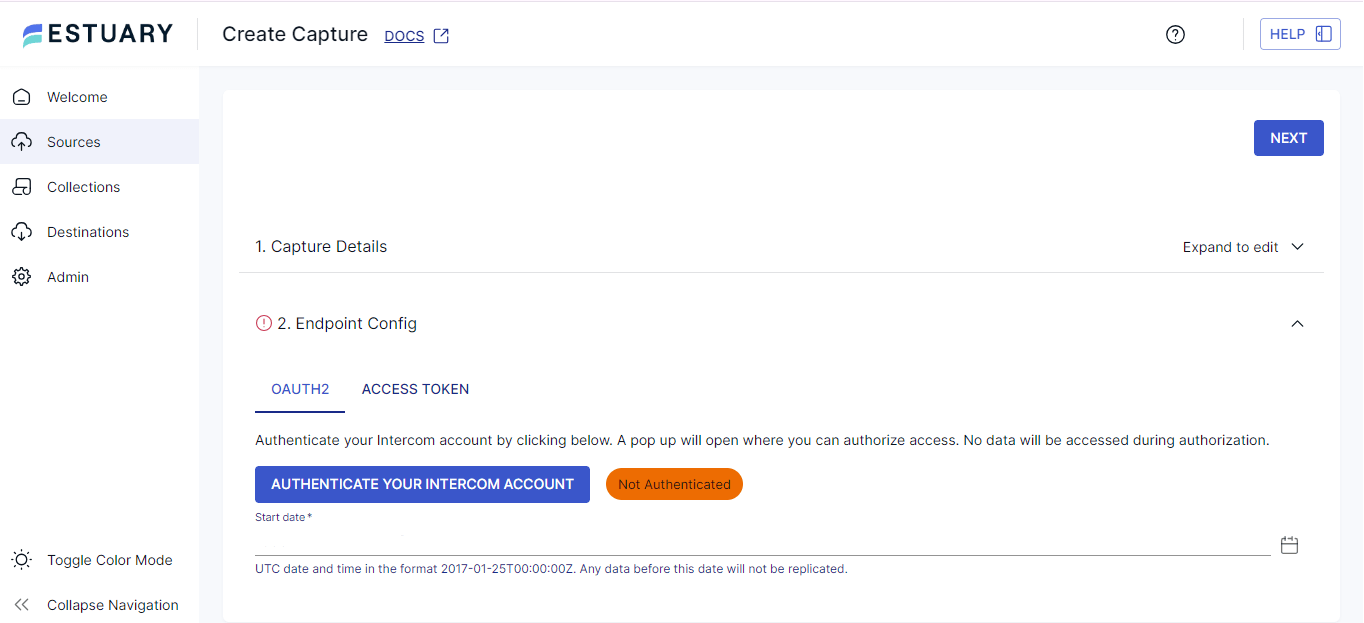
- In the Endpoint Config section, authenticate your Intercom account with OAUTH2 or an ACCESS TOKEN.
- Specify the Start date (in UTC date and time format) from which you’d like to replicate the data. Any data before the mentioned date won’t be replicated.
- Click NEXT > SAVE AND PUBLISH to complete the source configuration.
This batch connector allows you to capture your Intercom data into a Flow collection. The Intercom API supports data objects from the following endpoints:
- Admins
- Companies
- Company attributes and segments
- Contacts and Contact attributes
- Conversations and Conversation parts
- Segments
- Tags
- Teams
Step 2: Configure Snowflake as the Destination
After a successful Intercom capture, a pop-up window appears with the capture details.
- To start configuring Snowflake as the destination end of your data pipeline, either:
- Click the MATERIALIZE COLLECTIONS option in the pop-up window.
- Navigate to the Estuary Flow dashboard and click Destinations > + NEW MATERIALIZATION.
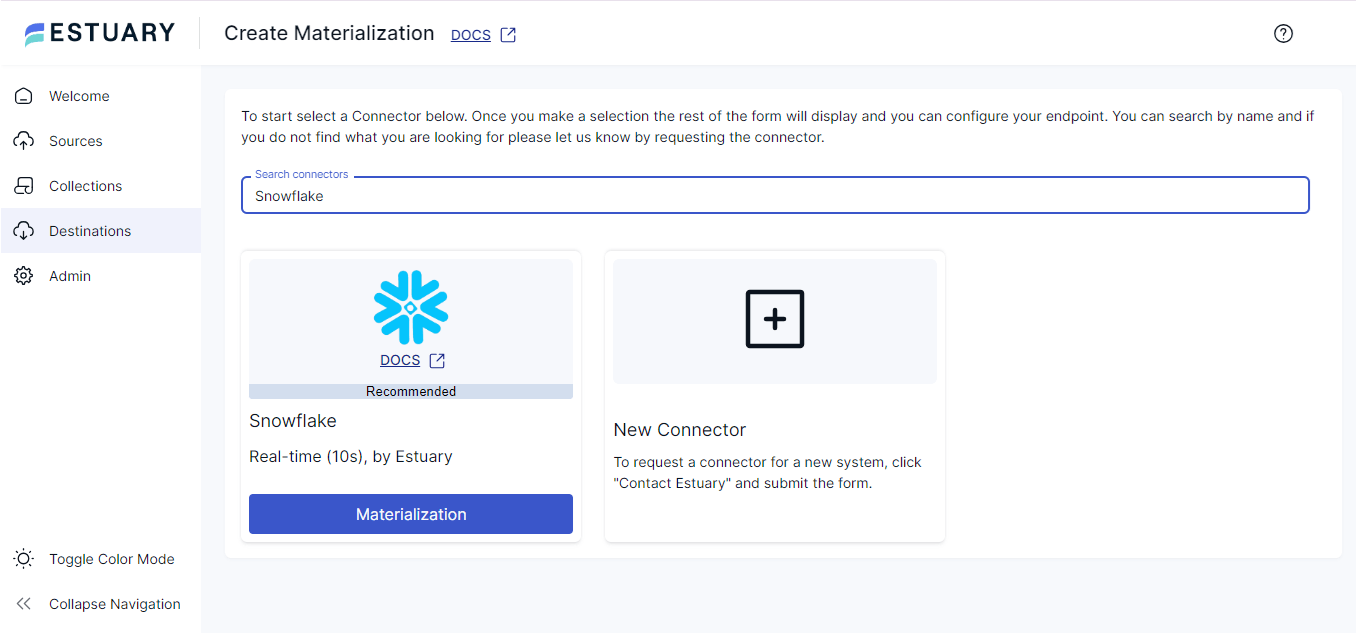
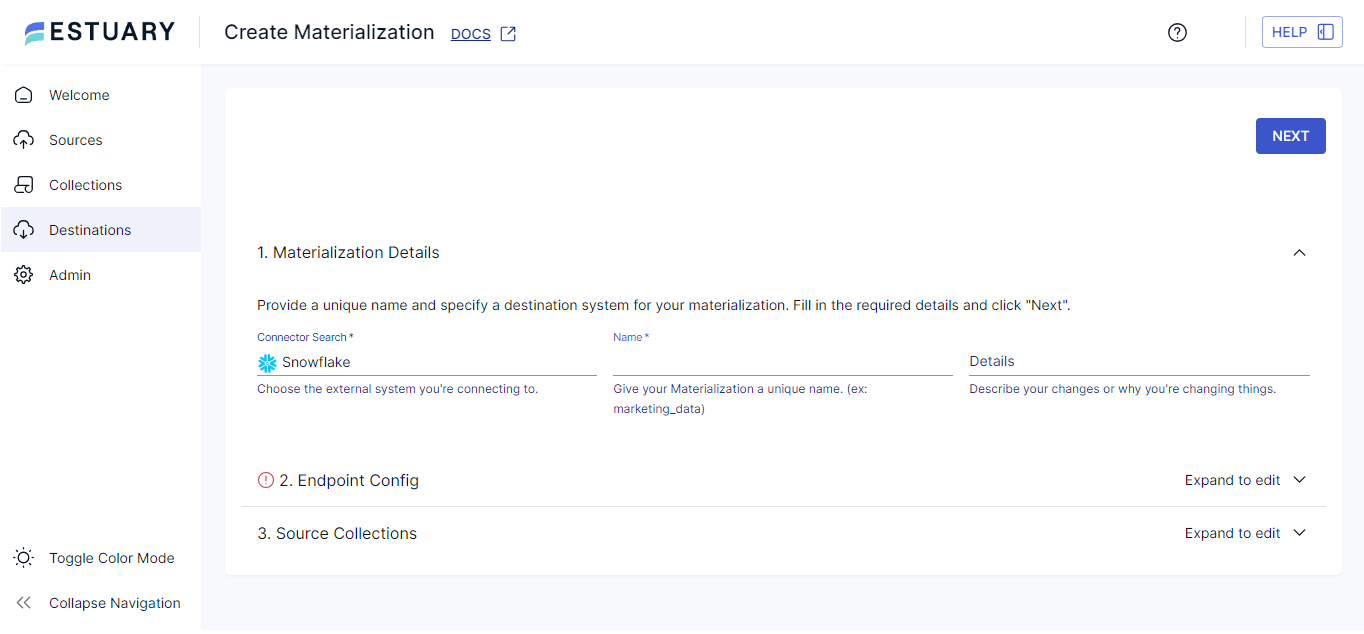
- Search for the Snowflake connector using the Search connectors field on the Create Materialization page.
- Click the Snowflake connector’s Materialization button.
- On the Create Materialization page, specify a unique Name for your materialization.
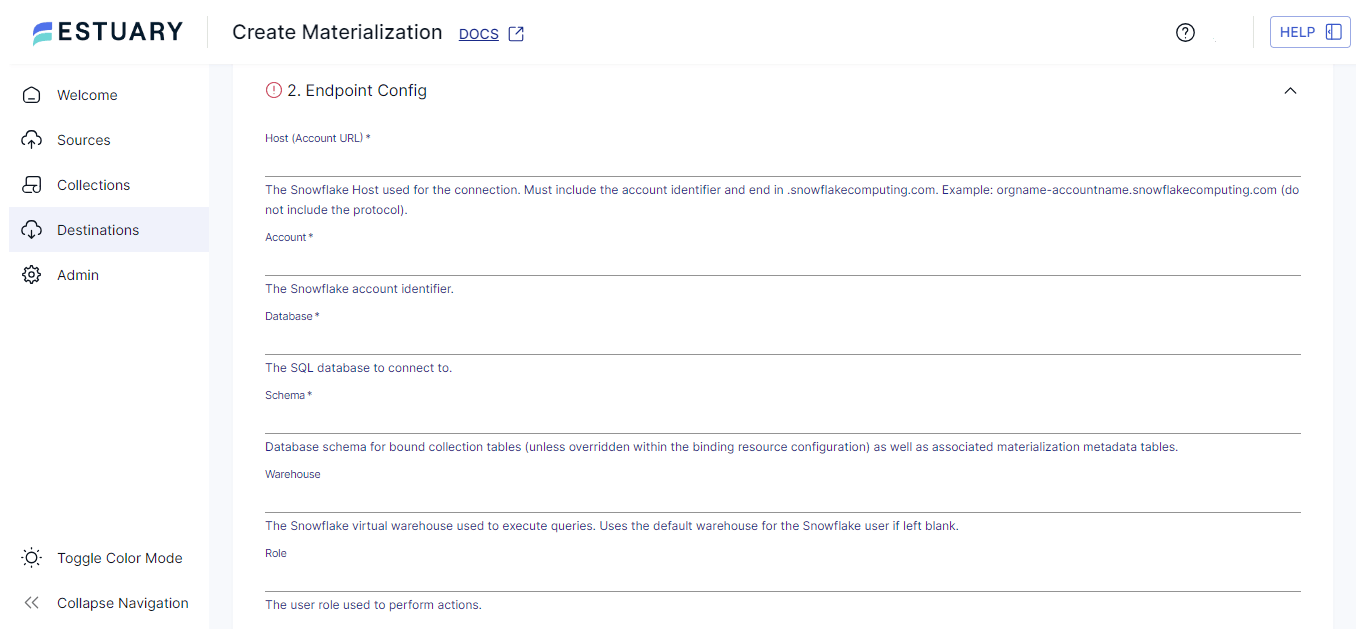
- In the Endpoint Config section, specify the following mandatory details:
- Host (Account URL): This is the Snowflake host used for the connection.
- Database: This is the SQL database to connect to.
- Schema: This is the database schema for bound collection tables and metadata tables.
- For authentication, you can use your Snowflake user login name and password or a private key to sign the JWT token (for key-pair authentication).
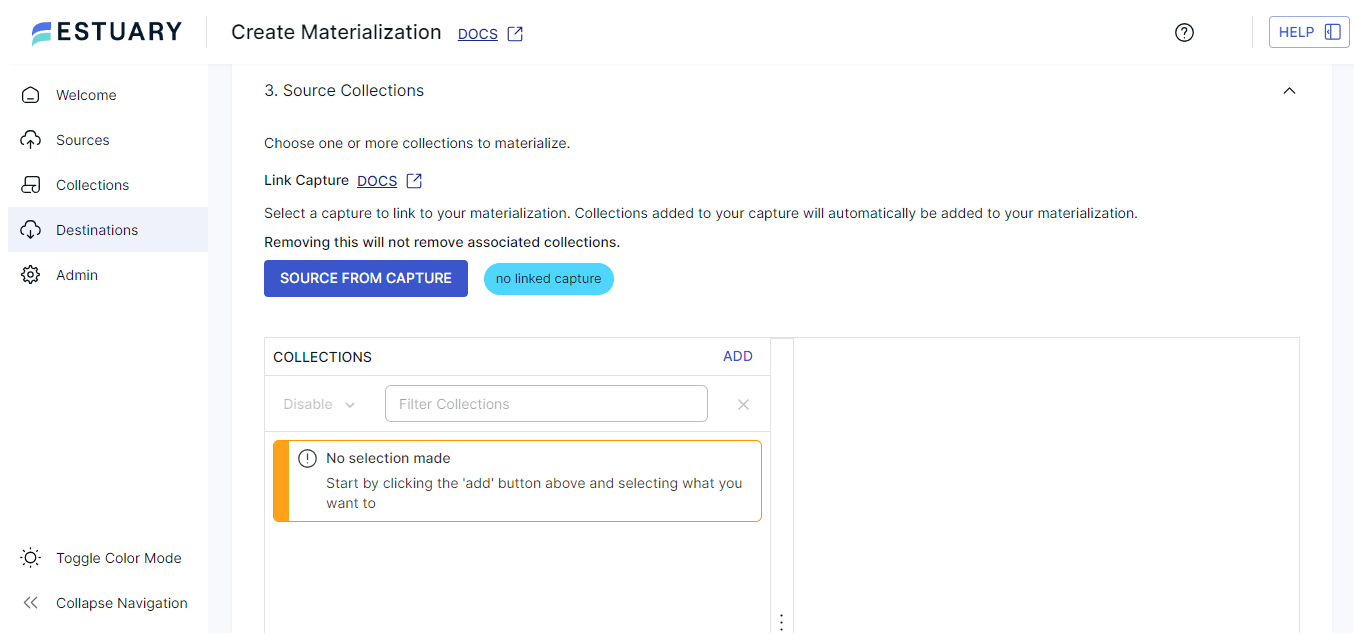
- Click the SOURCE FROM CAPTURE button in the Source Collections section to manually link the capture of your Intercom data to the materialization.
- Click NEXT > SAVE AND PUBLISH to materialize the Flow collection of your Intercom data into tables in your Snowflake database.
The real-time connector first uploads data changes to a Snowflake table stage. Then, it transactionally applies the changes to the Snowflake table.
Method 2: Using CSV Export/Import to Load Data from Intercom to Snowflake
You can use this method to export specific Intercom data, such as conversations, tickets, or messages. The export results in a CSV file downloaded to your local system. You can then load this CSV data into your Snowflake data warehouse.
Step 1: Export Intercom Data as a CSV
To export your Intercom message data within a particular date range as a CSV file:
- Sign in to your Intercom account.
- Click on the Reports icons in the dashboard sidebar.
- Select All Reports > Customer engagement overview > Export CSV.
- In the Customer engagement overview section, specify the date range for the data you want to export.
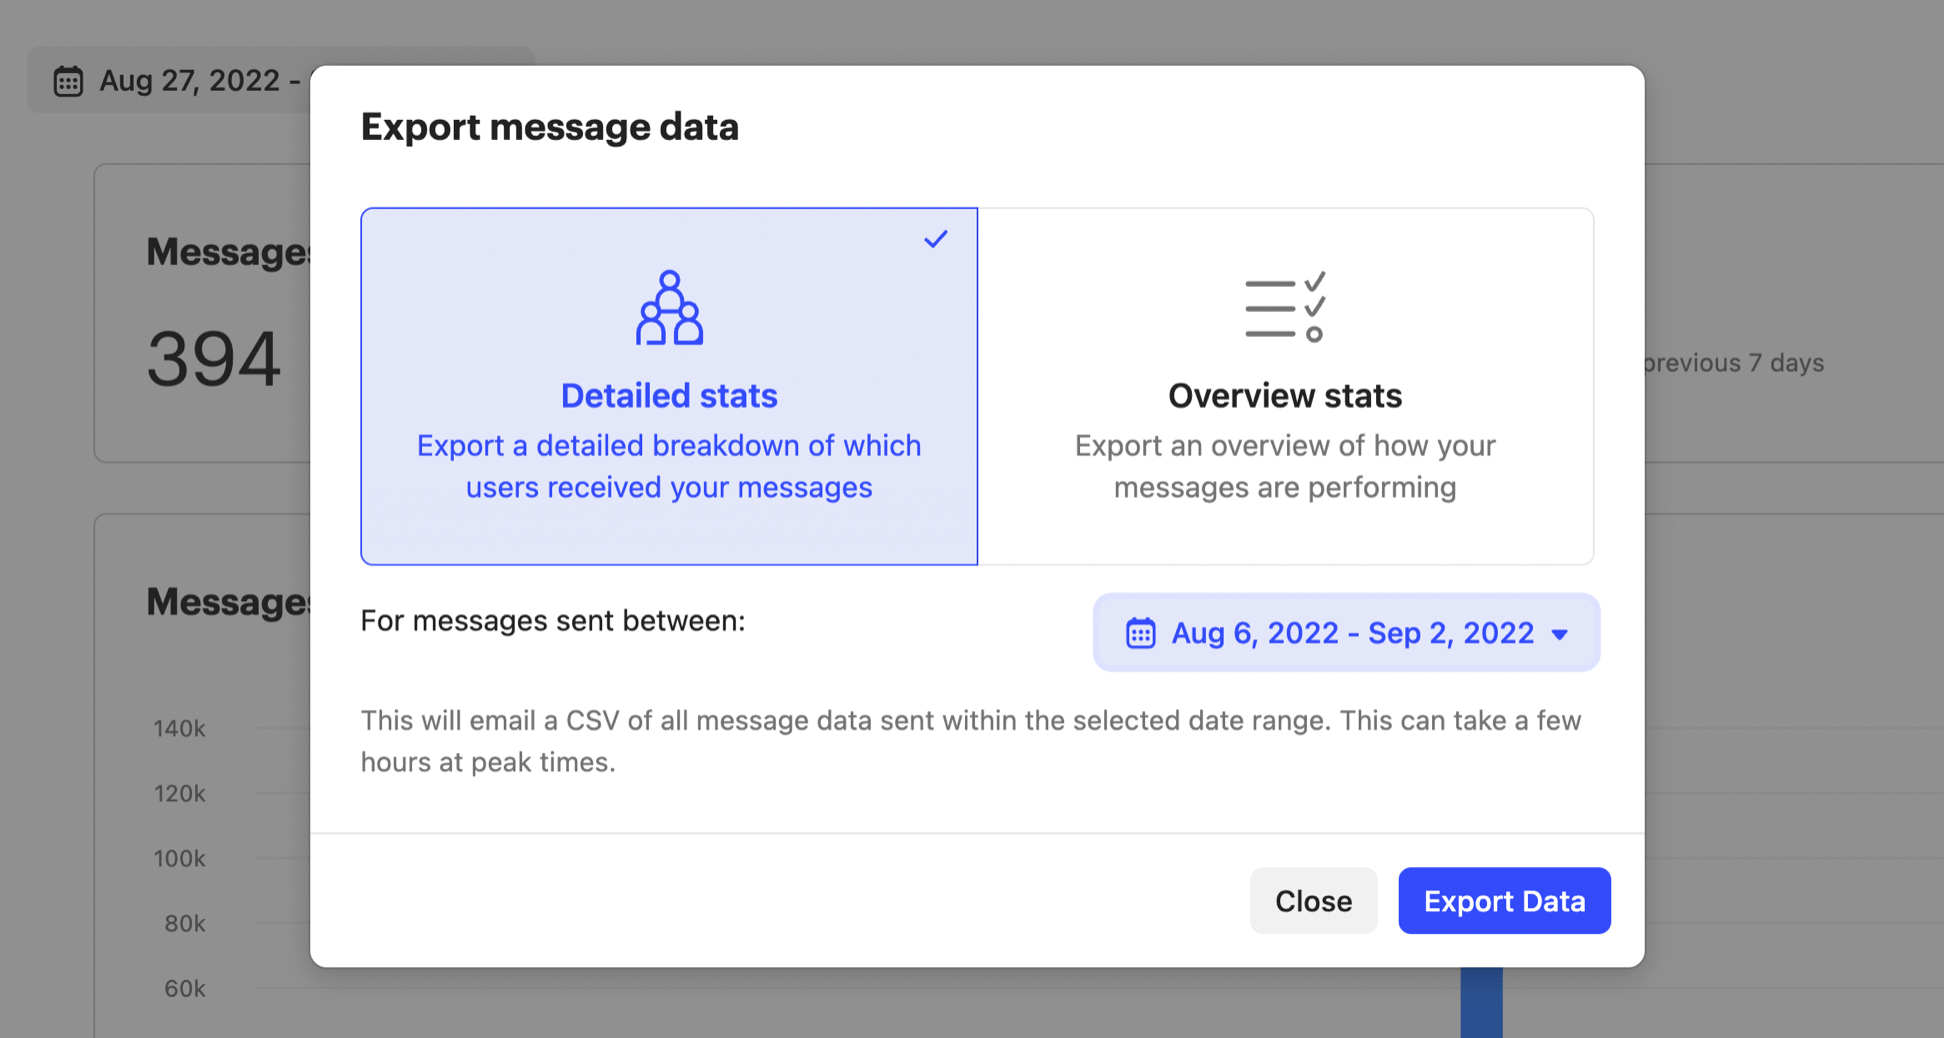
- You can choose from two types of reports:
- Detailed Stats: Provides a detailed breakdown of users who have received messages within your specified date range.
- Overview Stats: Offers an overview of the performance of your outbound messages and includes auditing data.
- Click Export Data > Export to start the data export process.
- Check the email address registered with your Intercom account. You will receive an email with a link to download the CSV file.
For more information, read how to export message data as CSV. You can also export other Intercom data related to conversations, tickets, users, leads, and companies as separate CSV files.
Step 2: Load CSV to Snowflake
Before you begin, ensure the following prerequisites:
- A Snowflake database, table, and schema that matches the source file.
- Create a named file format for your Snowflake database.
Then, follow these steps to load a CSV file to Snowflake:
- Log into your Snowflake account and navigate to Snowsight.
- Click on Data from the navigation menu on the left, then select Add Data.
- Select Load data into a Table on the Add Data page. This will open the Load Data into Table dialog box.
- Choose a data warehouse for ingesting the data.
- Click on Browse to select the CSV file you want to load from your local computer.
- Select the appropriate Database, Schema, and Table into which you want to import the CSV data.
- Click Next > Load to start the loading process.
Snowsight will import your CSV file and also provide a summary of the operation, including the number of rows successfully inserted into the Snowflake table.
Read more about how to load CSV files from a local machine to Snowflake.
Limitations of Using CSV Export/Import for an Intercom Snowflake Integration
- Lack of Real-time Capabilities: The method doesn’t support real-time data synchronization. Any changes made in your Intercom data will not immediately reflect in Snowflake. By the time you’ve uploaded your CSV file, there is a very real chance that this data is now stale. By using a managed tool like Estuary Flow, you can rest assured that the data in your custom reporting is as fresh as in the Intercom application itself.
- Time-Consuming and Error-Prone: Exporting data from Intercom as a CSV can be a long process, especially when dealing with large datasets. If you have to do this task daily or even weekly, then you’d be wasting hours each quarter that could be better devoted towards strategic initiatives. Furthermore, loading these CSV files into Snowflake can be error-prone due to the human element through several steps of the process and lack of logging in those steps.
- Limited Export Capability: The method does not allow you to extract all of your Intercom data objects into a single CSV file. Instead, you must perform multiple exports for messages, conversations, and leads. This requires organizing separate CSV files for each category, adding to the complexity of the data integration process.
Conclusion
Integrating data from Intercom to Snowflake can significantly enhance your ability to consolidate and analyze customer data.
In this article, we explored two efficient methods for transferring data from Intercom to Snowflake.
While the CSV export/import method can be effective, it is time-consuming, error-prone, and limited in its capabilities. Simply put, it’s a solution that does not scale.. Estuary Flow offers an alternative that addresses these limitations.
With Estuary Flow’s real-time ingestions, data transformations, and ready-to-use connectors, setting up your integration pipelines becomes an almost effortless process taking no more than ten minutes to get your pipeline up and running with minimal overhead once that’s complete.
Are you looking for a streamlined solution to integrate data between different platforms? Register for your free Estuary account to get started!
FAQs
What kind of analyses can you perform with Intercom data in Snowflake, and how can these insights drive business growth?
- Customer Segmentation: By analyzing customer interactions and behavior data in Snowflake, you can create detailed customer segments. These segments can be used to tailor marketing campaigns, personalize customer experiences, and improve product offerings based on specific customer needs and preferences.
- Sentiment Analysis: Using machine learning models and natural language processing (NLP) within Snowflake, you can perform sentiment analysis on customer conversations. This helps you gauge customer satisfaction, identify recurring issues, and improve customer support strategies.
- Churn Prediction: By analyzing historical customer interactions and behaviors, you can build predictive models to identify at-risk customers. Understanding the factors that contribute to churn allows you to take proactive measures to retain customers, such as targeted outreach or personalized offers.
- Sales Funnel Optimization: By integrating Intercom data with sales and marketing data in Snowflake, you can analyze the entire customer journey. This comprehensive view helps you identify bottlenecks in the sales funnel, optimize conversion rates, and align your sales and marketing strategies more effectively.
What are the long-term benefits of using Estuary Flow to automate the integration of Intercom data into Snowflake, compared to traditional ETL processes?
- Real-Time Data Synchronization: Estuary Flow ensures that your sentiment analysis and churn prediction models are continuously updated with the latest customer interactions, allowing you to promptly address emerging issues, enhance customer satisfaction, and take proactive measures to retain at-risk customers.
- Operational Efficiency and Analytical Precision: By automating data integration, Estuary Flow reduces the time spent on manual data management, enabling your team to focus on fine-tuning customer segmentation and sales funnel optimization. This leads to more precise targeting in marketing campaigns and more effective conversion strategies, driven by up-to-date insights.
- Scalability for Evolving Analytical Needs: As your data volume grows, Estuary Flow’s scalability ensures that your analyses—whether segmenting customers based on behavior or optimizing the sales funnel—remain efficient and accurate, allowing your business to adapt to increasing data demands without sacrificing the quality of insights.
- Flexibility for Enhanced Analysis: The flexible, no-code interface of Estuary Flow allows you to easily manage and modify data pipelines, ensuring that your sentiment analysis, churn prediction, customer segmentation, and sales funnel optimization processes can evolve seamlessly with your business needs, driving better outcomes in customer engagement and sales performance.
Start streaming your data for free
Build a PipelineAbout the author
Rob Meyer is the VP of Marketing of Estuary. He has worked extensively in marketing and product marketing on database, data integration, API management, and application integration technologies at WS02, Firebolt, Imply, GridGain, Axway, Informatica, and TIBCO.


